


I have to say this was really fun to recreate but it did take about 1.5/ 2 hours to complete. So I just want to say I'm not claiming to be the best at Halloween make up or make up in general I just love experimenting with it and I really enjoy using it and I love make up!
So to recreate this look we used a Snazaroo face painting kit, 120 BH Cosmetics Palette, Natural Collection Foundation in Walnut, Lord and Berry Smudgeproof Eyeliner in Black,Mac liquid Liner in Boot Black and a white Khol pencil. So really not loads of products but I think it looks really effective.
I would say if you recreate this look you need to use quite a lot of brushes as there is a lot of blending and applying of different face paints so it's good to use different brushes to get the true colours of the paints.
One thing we are going to do differently when it comes to Halloween is we are going to disguise Toms eyebrows so that the creases are more prominent. I will do this using the glue stick method where you glue the eyebrows down and then put concealer over them so that they are hidden. This is really easy to do and there are loads of tutorials of this on YouTube but I didn't think of doing this until half way through the look!
So I will move onto how we created this look :).
1) Apply Natural Collection's Foundation in Walnut all over the face. We used this one as it was quite a lot darker than Tom's natural skin tone which is what you want when creating this look.

2) Using a black eyeliner line the inner rim of the eyes and all around the eyes. Make sure to blend this out to give a smokey blended look as we don't want it to look precise and pretty.

3) Then create the lines on the eyebrows, forehead and under eyes using a small angled brush and dark brown face paint. Once these are on blend them out with a dark brown shadow so there are no harsh lines and then add a black shadow to add definition and shading to the look. Add black shadow to the innner corner of the eye to make sure this area is really dark.


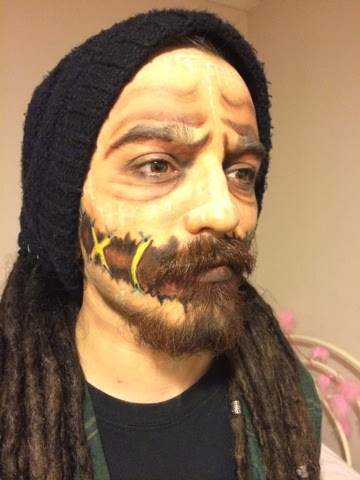
4) Using a wet brush and a yellow shadow create lines and crosses where you want them to create a stitched mouth effect. Tom obviously had quite a bit of facial hair so we created his mouth look a lot wider than you would have to if you didn't but I think this shows that you can still do it if you have facial hair!

5) Then using brown face paint and a small angled brush I drew in the lines connecting the mouth. Obviously this needs to look ragged and not neat at all. Don't go over the yellow lines and crosses you have just made and shade the whole area in brown.
6) Once you've done this outline the edges of the mouth and of the yellow lines and crosses in liquid liner to create a gradient effect and then using black eye shadow add this to the outer edges so that the mouth area is really dark. Go over the yellow areas with more yellow as you do this as you want those areas to remain vibrant. Once the mouth is all filled in using a white pencil or face paint add a highlight to the yellow stitches.


7) Add little grey v shapes to the top and bottom of the yellow stitches to make them look sunken in. And also add a dot of black to the top and bottom of the yellow stitches to add to this effect.
8) I then used a white face paint to create a cross pattern on his face to give the effect of a sack. I created vertical lines down his face with the white face paint and then using the same face paint did horizontal lines. I did this quite faint as I didn't want them to be too prominent.
9) I then used a brown shadow to add areas of shading across parts of his face that I thought needed darkening.
Once this is all done you are complete!
I hope this makes sense and if not head over to MadeYewLooks video as we based this look on how she created her scarecrow. We obviously used different products and changed little bits here and there but it was based on her look. She has amazing Halloween tutorials so I would definitely recommend heading to her channel and watching some of her amazing videos!
Hope you enjoyed this and hopefully I will have another Halloween look up tomorrow so make sure you come back for that (if you want to of course :))!
Much love,
Lucy x
No comments:
Post a Comment