Friday 31 October 2014

October Favourites

Hi everyone I cannot believe it's Halloween already October has went so fast but I'm quite happy as today is one of my favourite days! I love Halloween but I'm not going out tonight to celebrate but I am going out tomorrow- I'll take some photos and put them on here so you can see what I dress up as!
I didn't know whether to do an October favourites as I haven't really tried loads of new beauty things but then favourites don't have to be just beauty so here are my October faves!
1) L'Oreal Miscellar Water

I really like this I think it's really good value and it removes every single bit of make up. It did at first sting my eyes a bit but the more I used it the less it hurt so I enjoyed that. I would definitely repurchase!
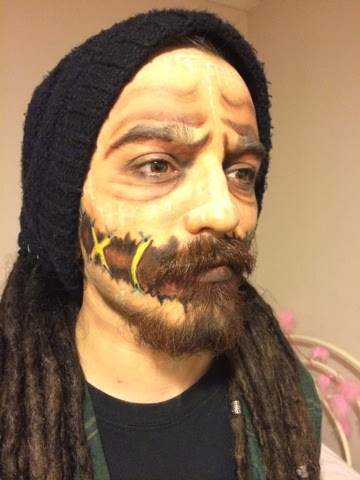
2) Snazaroo Face Painting Kit

This is a strange one to include but since this month includes Halloween and I have been trying different looks out I have had to include this. This was only £12 and it is such a bargain as the colours are really pigmented and go on nicely and not patchy at all. You also get a good selection of colours so if you are in need of face paint I would recommend this one.
3) Mask of Magnaminty by Lush

I have been using this at least once a week this month and I would definitely say it has helped my skin a lot. Using this with my nightly acne cream has meant my skin is looking so clear and not as red as usual so that's also a bonus.
4) Currant Lip Liner by Mac

I was never a big fan of lip liners but lately I've been loving them and this is my absolute favourite. It's a lovely dark berry colour and I love to wear this all over my lips. Also, its a great colour for autumn/ winter.
5) Tartan Scarf from River Island

So I've wanted a tartan scarf for like a year now not even exaggerating but I could never find a tartan that I liked. I love this one that I found in River Island though, I think it's the perfect tartan colour and it was only £15 which I don't think is bad considering that I feel that it is good quality. Even though the weather hasn't been really cold up here I have still been wearing this all month. 
6) Fur Gilet from Topshop

I LOVE this! I've had it for a month and a bit now and I think it's so versatile and you can wear it with pretty much anything. Mine is from the Tall range which I am clearly not but I like it having that little bit more length so it doesn't look as boxy. You could dress it up or dress it down and it comes back year after year so I will definitely get my money's worth. This is a little bit pricey but it is more of an investment piece. You can get quite a few different colours in this but I love the black one haha.

So not many favourites this month but I thought I would share these few things, keeping it short but sweet :).
Hope you have had an amazing Halloween!
Much love,
Lucy x

Tuesday 28 October 2014

Lipstick Addict Tag!

So I decided to do the Lip Addict tag as lip products are my favourite. I know you are supposed to be nominated to do this but I don't really see why that matters and I thought it would be fun to do!
  1. Favourite balm/treatment?

    I would have to say the EOS lemon lip balm. Not only does it smell amazing, it is also not greasy and is very lightweight as that is one thing that can annoy me about lip balms when they are all greasy and sticky. It's also so easy to apply you don't have to stick your fingers in it. I put it on every night before bed and every morning I wake up with soft lips!

  2. Best eye-catching red?

    I love Mac's Ruby Woo. I have tried so many reds and I could never find my perfect one until I found this one. It's a really true red with blue undertones and it is a matte which I love. However, this one is so matte it can be a bit difficult getting it on your lips but if you put a lip balm under it then it glides on nicely.

  3. Best luxury & best drugstore?

    I don't know if you would class Mac as luxury but I would as ther lipsticks are quite expensive but I do love them! All the ones I have tried have been so pigmented and felt nice once on, Mac is definitely my fave! Best drugstore I would probably say Barry M. I have tried a few Barry M lipsticks and they have all been very nice and pigmented and they aren't expensive either.

  4. Best MAC lipstick?

    This is a really difficult one as I love all of the ones I have got. Oh I don't know what one to choose.....I'm going to say Saint Germain. It's just the most perfect pink and looks good with most make up looks too.

  5. The most disappointing?

    I would have to say Revlon's Just Bitten Kissable Balm Stain in Romantic. I thought with this being a stain it would be really pigmented and it looks really red in the tube. Once it's on the lips though it is really sheer and it looks a totally different colour so I was quite disappointed with this one.

  6. Liner - yes or no? (What brands if yes)

    It would use to be a no but these days I love liner! I think it's because you can enhance your lips, you can change the shape and it stops lipstick from bleeding. I've only tried a few brands when it comes to lip liners but I would say my favourite would be Mac haha but I really want to try a few Nyx ones, as they are meant to be really good too.

  7. Best gloss?

    I am not really a gloss fan, I do prefer matte lips and also a lot of glosses make my lips feel disgusting and I know a lot of people can put up with that feeling but I can not haha. I did use to love Mac's C-Thru lipglass on top of their Myth Lipstick it created the perfect nude lip. 

  8. Something extra! (Honourable Mention)

    I would have to say Topshop do amazing lipsticks and I don't think too many people have tried them. I know people would say maybe I am biased because I work there but I wouldn't lie and just say I like them, what would be the point of that I don't get anything for saying I like them :). I just think that they have an amazing colour selection and that they are all really pigmented. I would say my favourite is Depth. It's such a lovely dark purple lipstick, if you like dark lip colours I would definitely suggest this one!

    I nominate anyone who wants to do this tag to do it!

    I hope you have enjoyed reading this and let me know what your favourite lip product is!

    Also I have a new Facebook page it's www.facebook.com/lucyloublog (sorry it wouldn't let me link this but you can just copy and paste it :)) and I would love if you could go over and like it only if you want to though haha!

    Much love,

    Lucy x

Sunday 26 October 2014

Halloween Look 3- Sugar Skull


So when I sat down earlier on I was still deciding what look I should do next and the only two I have out up so far are more scary than some people may like so I though I would do a sugar skull as this look is a bit less scary and you can make it quite girly.

I have done a sugar skull for Halloween before but it was quite a few years ago so I did look around on google images for some inspiration and ideas but I knew I wanted a pastel blue look as that's ones of my favourite colours.

So this look is quite fiddly to do and you need a still hand but I did find that doing your markingswith a white Khol pencil first helps as it's easier to correct than if you go straight in with a black.

So I didn't use that many products to make this look. I used Snazaroo face paints, white pressed powder, white khol pencil, black eyeliner, BH Cosmetics 120 eyeshadow palette, a cheap palette with glitter shadows (unsure of the brand), nail art gems, mascara and eyelash glue.

So this is just my interpretation of a  Sugar skull/ day of the dead skull. If you wanted to do this then you could change the colours if you wanted to or the whole look! It's up to you! But if you want to know how I created mine keep reading :).

1) Using the white Snazaroo face paint cover your entire face and neck with this until you are completely white.

2) Set your face paint using a white pressed powder to make sure it stays put and doesn't slide around your face.

3) Draw two circles aroundyour eyes using the white pencil and then use a wet brush to apply the clue glittery colour to the inner parts of the circle.


4) Add a slightly darker blue colour to the edges to create some depth and then using a black eyeliner go around the edge of each circle. Do this a couple of times to ensure the line is really black.

5) Then go around each of the circles and create petals around the edges, again do this a couple of times to make sure they look black.

6) Use a really thin brush and a blue shadow or face paint put a dot in each of the petals.

7) With the black eyeliner colour in your lips so that they are full black and create two lines from the corner of your mouth. Then put vertical lines over your lips and lines to create the effect of teeth.

8) Again with the black eyeliner draw a tear drop shape on your nose and colour the full shape in black.

9) Apply some mascara and and line your inner waterline with black liner.

10) Using the white pencil outline a flower shape on your chin. I created one with three petals. Once you are happy with the shape colour it in using the same blue colour you used for your eyes and outline it with the black liner. At the top of each petal add a nail gem using eyelash glue.


11) Using the white pencil draw another tear shape in the centre of your forehead and add some swirls to either side of it. Once you are happy with it colour the tear in with the same blue colour and the outline it and the swirls with the black liner. Add a nail art gem to the top of the tear shape and at the edge of each swirl.

12) Contour your cheeks and forehead with a dark grey colour. Then the look is all done! 

I would have liked to add a lot more gems and glitter to this look but I thought I knew where mine was but I couldn't find it. These are really easy to recreate they just take practise!
Out of the Halloween looks I have created what one have you liked the most? Or what would you like me to try next? I'm so excited Halloween is less than a week away!!!

Also if you like reading my blog I would really appreciate if you followed my Bloglovin!

Much love,
Lucy x

Saturday 25 October 2014

Halloween Look 2- Scarecrow (Unisex)


So today I decided to practise my boyfriend's Halloween make up as it's always good to practise. He has decided to be a scarecrow this year so we looked at loads of different YouTube Scarecrow Tutorials and based his on the look MadeYewLook did in her video. So this look is unisex and is more of a scary scarecrow than say ones based on the scarecrow from the Wizard of Oz.
I have to say this was really fun to recreate but it did take about 1.5/ 2 hours to complete. So I just want to say I'm not claiming to be the best at Halloween make up or make up in general I just love experimenting with it and I really enjoy using it and I love make up!
So to recreate this look we used a Snazaroo face painting kit, 120 BH Cosmetics Palette, Natural Collection Foundation in Walnut, Lord and Berry Smudgeproof Eyeliner in Black,Mac liquid   Liner in Boot Black and a white Khol pencil. So really not loads of products but I think it looks really effective.

I would say if you recreate this look you need to use quite a lot of brushes as there is a lot of blending and applying of different face paints so it's good to use different brushes to get the true colours of the paints.

One thing we are going to do differently when it comes to Halloween is we are going to disguise Toms eyebrows so that the creases are more prominent. I will do this using the glue stick method where you glue the eyebrows down and then put concealer over them so that they are hidden. This is really easy to do and there are loads of tutorials of this on YouTube but I didn't think of doing this until half way through the look!

So I will move onto how we created this look :).
1) Apply Natural Collection's Foundation in Walnut all over the face. We used this one as it was quite a lot darker than Tom's natural skin tone which is what you want when creating this look.

2) Using a black eyeliner line the inner rim of the eyes and all around the eyes. Make sure to blend this out to give a smokey blended look as we don't want it to look precise and pretty.

3) Then create the lines on the eyebrows, forehead and under eyes using a small angled brush and dark brown face paint. Once these are on blend them out with a dark brown shadow so there are no harsh lines and then add a black shadow to add definition and shading to the look. Add black shadow to the innner corner of the eye to make sure this area is really dark.


4) Using a wet brush and a yellow shadow create lines and crosses where you want them to create a stitched mouth effect. Tom obviously had quite a bit of facial hair so we created his mouth look a lot wider than you would have to if you didn't but I think this shows that you can still do it if you have facial hair! 

5) Then using brown face paint and a small angled brush I drew in the lines connecting the mouth. Obviously this needs to look ragged and not neat at all. Don't go over the yellow lines and crosses you have just made and shade the whole area in brown.

6) Once you've done this outline the edges of the mouth and of the yellow lines and crosses in liquid liner to create a gradient effect and then using black eye shadow add this to the outer edges so that the mouth area is really dark. Go over the yellow areas with more yellow as you do this as you want those areas to remain vibrant. Once the mouth is all filled in using a white pencil or face paint add a highlight to the yellow stitches.


7) Add little grey v shapes to the top and bottom of the yellow stitches to make them look sunken in. And also add a dot of black to the top and bottom of the yellow stitches to add to this effect.

8) I then used a white face paint to create a cross pattern on his face to give the effect of a sack. I created vertical lines down his face with the white face paint and then using the same face paint did horizontal lines. I did this quite faint as I didn't want them to be too prominent.

9) I then used a brown shadow to add areas of shading across parts of his face that I thought needed darkening.
Once this is all done you are complete!

I hope this makes sense and if not head over to MadeYewLooks video as we based this look on how she created her scarecrow. We obviously used different products and changed little bits here and there but it was based on her look. She has amazing Halloween tutorials so I would definitely recommend heading to her channel and watching some of her amazing videos!
Hope you enjoyed this and hopefully I will have another Halloween look up tomorrow so make sure you come back for that (if you want to of course :))!
Much love,
Lucy x

Friday 24 October 2014

Love ME Beauty Box- October Edition


So I finally got my second Love ME Beauty Box delivered today. I did get a bit worried about this as I got an email on the 3rd of this month saying that my box had been dispatched so I got in touch with the Love ME Beauty team and I have to say they were really helpful and lovely. They managed to check where my box was and why it hadn't been delivered to me which was great. But now it's here and I can share with you what's in my box!
First of all yet again really nicely packaged and I love the little cloth bag that it comes in, I will definitely find some use for that! 
Percy and Reed Dry Conditioner


This was a brand that I haven't heard of before but I do love the packaging, it's very sleek so I'm more than happy to give this a go! It's meant to add shine to even very dry hair and reduce any damage that may be caused by brushing. My hair is probably in the best conditioner it's been in so far for a good few years so I'm always trying to keep it that way and anything that will help with that I do like to try so I'm excited about trying this!
Montagne Jeunesse Hot Spring Sauna Mask

I've tried a mask from this range before for one of my Face Mask Fridays and I really did like it so I'm very excited to try this one. I obviously haven't tried this mask but I will be trying it out tonight. This mask is meant to be exfoliating and nourishing which are my favourite types of mask and this one is meant to give your face a warming sensation once you've applied it so that will be interesting to try! 
Murad Vitalic Pomegrante Exfoliating Mask

So yet another face mask to try! It's a good thing I like face masks haha! So this one says that it will dissolve dull and dry skin and make your skin look fresh, clear, smooth and bright. Now I am a bit worried about trying this one as my skin isn't dry at all so I'm really hoping that this doesn't irritate my skin but I'll never know until I try it. I will probably try this one next week at some point but I'm more than happy to leave a review on it as I know this brand has got a lot of skin care products that are quite popular in the U.S. I have actually been wanting to try this brand out for quite a while now.
So I'll definitely leave a post on this one next week at some point!
Lord and Berry Black Smudgeproof Eyeliner

This was a brand that I have heard about before but had never tried any of their products before. I do know that Asos stock this brand though if anyone was interested in trying any of their products. This eyeliner is meant to be really easy to apply and is waterproof which is great as sometimes my eyes love to water a lot! It's also meant to keep its colour for up to 24 hours which I really like as I like my eyeliner to look really black although I doubt anyone would keep eyeliner on for that long but it's good to know haha :). I normally always wear liquid eyeliner but I definitely will be trying this out to see if it is as good as it is meant to be! 
 
I would just like to put a little disclaimer out there that I am not trying to brag about getting these boxes or trying to show off. All I'm doing is sharing what I got in my box to let people know what types of products you get in boxes like this so they can decide whether they want to join or simply just for people who like reading about what you get in these types of boxes. I know that I like reading blog posts about what people get so I thought I would share mine with you.
I hope you've enjoyed reading this post and if you would like anything reviewed just let me know below and I will get that up for you!
Much love,
Lucy x

Thursday 23 October 2014

NEBlogger Awards


So last night me and my friend went to the first ever North East Blogger Awards. Both of us had never been to anything like this before so I thought it would be something fun to do. It was also a great chance to meet some fellow North East bloggers and find out about different types of blogs to add to my reading list!
So this event was held at Lane 7 in Newcastle and I was very impressed at the layout and decor as I hadn't been before, it was really lovely inside.
When we went inside we got a free drink which I thought was really nice of them to offer and since I was driving I had a rose lemonade but it was still really nice! Throughout the night we were offered food and there was a bar so you could buy drinks and since Lane 7 is a bowling alley there were two lanes open so if you fancied having a go, you could. I was overwhelmed by how many people turned up and I think it was a great turn out for them! 
Everyone seemed really friendly and it was a great night to find out about other bloggers and have fun :).
Well done to all the winners and as we left everyone received a goody bag so I thought I would share what was inside my goody bag! I think most of the items in the goody bag were donated by the sponsers of the night.


I thought I would also include a picture of how I did my hair and make up for last nights event!


Hope you enjoyed this post and if you came to the event hope you had a great time too!
I was maybe thinking of doing a weekly YouTube video to go alongside my blog but still undecided if you think it would be good idea let me know below or if you have any advise for starting out on YouTube I would love to know!
Much love,
Lucy x

Monday 20 October 2014

Lazy day and nail art!


So I have been away for a little while and I do apologise it's been a mixture of not being well and having loads of stuff to do so I'm sorry. But I am off this week which means hopefully I will get a post up each day and if not at the least every other day! 
So today has been a really lazy day for me and as I don't get them too often I like to make the most of it when I do so I have literally done nothing and loved every minute haha! So to fill in some time I decided to paint my nails and as I had lots of time on my hands I though I would do a bit of nail art.
So I decided to paint my nails black and to add gems on from the little pack which I got from Topshop months ago but I'm pretty sure they still sell them :). 
So I'm not the best at painting my nails but this design is so simple anyone could do it! I do normally wear acrylics but as I have said I am trying to give my nails a little break before getting the acrylics back on.

So I started by applying the Leighton Denny topcoat but I used it as a base coat as it does the job. I applied this once I had filed my nails.
I then put Barry M nail varnish in black on all of my nails and I did two coats of this.
Once that had dried I applied the Leighton Denny topcoat again and while it was wet I applied two silver gems to each nail. 

Then I went over each nail with the topcoat to seal the gems on.

Finally I finished it by applying the Leighton Denny Miracle Drops which dry your nails in seconds which I am shocked that this actually worked as I hate waiting for my nails to dry so this is perfect!
Then they're all done!
See, simple! 
So this was just a quick post and I do promise that my posts will be more regular again as I love blogging I really do sometimes life just takes over though! Let me know what you enjoy doing in your lazy days :).
Much love,
Lucy x